I’ve previously written about creating components and the various patterns that can be used in different ways to create a variety of outcomes. This time around, we’re going to explore a little more in this field but also understand how things work under the hood to better develop an intuition for creating resilient web applications.
Jump to heading Recursive components
Recursive components are components that can recursively invoke themselves in their own template. To better picture this, think about a tree or a cascade. Trees and nodes are elements and sub-elements being referenced over and over again.
As an example, let’s say we have a navigation where items can have sub-menus, following this input:
const items = [
  { to: '/home', label: 'Home' },
  { to: '/blog', label: 'Blog' },
  { to: '/about', label: 'About' },
  { to: '/contact', label: 'Contact' },
  {
    to: '/help-center',
    label: 'Help Center',
    items: [
      { to: '/privacy-policy', label: 'Privacy Policy' },
      { to: '/tos', label: 'Terms of Service' },
      { to: '/partners', label: 'Partners' },
      {
        to: '/faq',
        label: 'FAQ',
        items: [
          { to: '/faq/newsletter', label: 'Newsletter FAQs' },
          { to: '/faq/career', label: 'Employment/Career FAQs' },
        ],
      },
    ],
  },
]
Our Menu component will be:
const Menu = ({ items }) => (
  <ul role="menubar">
    {items.map((item) => (
      <li role="menuitem" key={item.to}>
        <span>{item.label}</span>
        {item.items ? <Menu key={item.to} items={item.items} /> : null}
      </li>
    ))}
  </ul>
)
It will recursively render Nodes in our tree until reaches the leaf node, in other words, when there’s no items left in the menu. You can use pattern to render nested data like a threads of comments in a more readable way.

However, there are a few things to keep in mind:
Generally speaking, this is sort of component is not much different from some of the patterns we’ve already seen, we could place any sort of logic and rendering behavior inside of it, but when we re-render a recursive component we are not repeatly rendering itself but also its children. So, keep it as simple as possible, heavy components may degrade performance of your app quickly.
As regular components, we can also gain direct access to them by attaching refs. But be careful when using refs with this kind of component. It will ultimately render the exact component and the ref will always be pointed to first iteration of that component which is the root.
Jump to heading Dynamic components
Sometimes we don’t know in advance what kind of component we need to render first. There might be scenarios where we need to wait and render according to data coming from backend or conditionally based on user interaction. For such cases as conditionally render a component upon coming data can be achieved by adding some if statements or directives, but is neither the most elegant nor maintainable way.
Dynamic components are components that can easily switch between multiple components completely by mounting and unmounting them. Some frameworks have a built-in component to achieve that like the Vue <component> tag and the <svelte:component> Svelte built-in component. These are known as meta-components.
In Vue, you can use the <component> element to dynamically render a component based on the is attribute. The prop indicates the actual component to render.
<script setup>
import ProductsTab from './ProductsTab.vue'
import FeaturesTab from './FeaturesTab.vue'
import AboutTab from './AboutTab.vue'

const currentTab = ProductsTab
</script>

<template>
  <component :is="currentTab" />
</template>
In the example above, will first mount the component associated with the currentTab variable. It will first render the products tab, later on, we can change the current component anytime we want by reassigning with the component or conditionally based on some other state or effect:
<button @click="currentTab = 'FeaturesTab'">Features Tab</button>
Upon switch the current component registered is unmounted in order to mount the next one. You can force ‘active’ components by using the Vue’s
<KeepAlive>built-in to keep their current state.
Dynamic components are a powerful tool to switch between components at runtime without the need to rely on conditionals. This can save time and improve the performance of your code. In fact, if you’re interested in seeing a real-world example of how dynamic components can be used, you can check out the following article: https://blog.codeminer42.com/how-to-use-dynamic-components-in-vue/
Jump to heading Trees and Interfaces
When exploring these patterns so far, raises the question of how all of this actually works under the hood. Like many things in programming, although tools and frameworks improve the developer experience by handling a lot of work behind the scenes, it is also interesting for us to get a grasp of how things work internally.
If you’ve ever built any type of app using a JavaScript framework there are high chances you heard about “virtual DOM”. A Virtual DOM is so-called a virtual representation of the DOM where the manipulations aren’t touching the actual DOM tree but rather in its virtual clone that gets updated with the necessary changes later on by the runtime renderer or compiler of that framework.
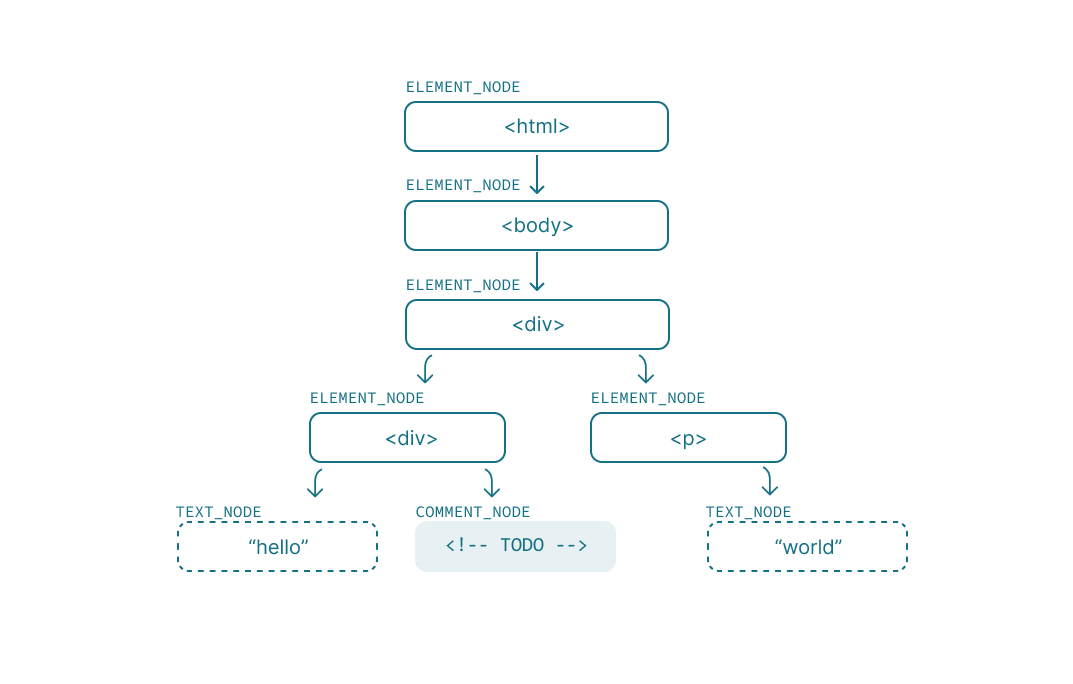
The DOM presents an HTML document as a tree-structure consisting of a tree of objects called nodes. They can have different types and also contain multiple nodes inside of them. The Node interface is merely just an abstract interface where other objects are based such as Document, Element, Comment, and Text nodes.
More often than not, we find ourselves most of the time focused on node elements as they are the most common interface we face when dealing with SVG or HTML elements, hence the methods we use to imperatively access and modify them like getElementById, createElement, firstElementChild and so on.
But how some of the components we’ve seen look when turned into plain JavaScript is what are going to next, let’s first focus and see how React and JSX approach this.
Jump to heading JSX and Element creation
JSX is the syntax that lets us write components in React, which for the majority of cases is all you need but we’re not limited to it. At the end of the day, components are essentially functions that take some input and return plain objects that going to be used to create the virtual nodes. Meanwhile, render functions are the way we can create elements using just JavaScript.
Let’s take for instance, a dead simple component:
function Greeting({ name }) {
  return <p className="text-bold">Hello, {name}</p>
}
It is equivalent to calling the createElement render function with some configuration:
React.createElement('p', { className: 'text-bold' }, `Hello, ${name}`)
Where the first argument represent the React element type, followed by the props or attributes and third and beyond arguments being children. Being just as flexible as JSX, createElement calls can also be nested within children:
function Greeting({ name }) {
  return createElement(
    'p',
    { className: 'text-bold' },
    `Hello, ${name}`,
    createElement('span', null, '👌') // the type can be HTML tag or an existing component
    // You can pass as much children as you need
  )
}
Will result in the following HTML structure:
<p class="text-bold">
  Hello, Jeferson
  <span>👌</span>
</p>
But when should you use render functions?
Chances are, for the majority of cases you will probably never use it. JSX and Single-file components are enough and can be very well optimized by their renderers and compilers. However, there might be situations where you can take advantage of render functions and use the full power of JavaScript to create logic-dense and dynamic components that don’t rely only on template/markup.
Now, before our code gets parsed and executed by the browser we need to transform the JSX syntax into plain JavaScript, and this is where dedicated tools like Babel and SWC comes in.
In releases previous to React 17, JSX would always translate to React.createElement calls for every new element needed to render, which required React itself to be in scope. Once the React team came up with the new jsx-runtime transformer, the element creation now delegated to JSX’s runtime that can read the code and compile to something like this:
import { jsxs as _jsxs } from 'react/jsx-runtime'

function Greeting({ name }) {
  return /*#__PURE__*/ _jsxs('p', {
    className: 'text-bold',
    children: ['Hello, ', name],
  })
}
(Our previous greeting example transpiled from Babel playground)
Similar to the nodes we just created using createElement API, the JSX runtime compiler will automatically create “jsx” or “jsxes” blocks of code out of the HTML-like syntax. The main job of the jsx factory function is to return element objects that can be identified as valid React elements:
// Very simplified example!
function elementFactory({ type, key, ref, props }) {
  const element = {
    $$typeof: Symbol.for('react.element'),
    type,
    key,
    ref,
    props,
  }

  return element
}

function jsx(type, props, key = null) {
  // ...
  return elementFactory({ type, key, ref: props.ref || null, props })
}
$$typeofis used to identify whether is a React element, Fragment or Portal.
A JSX element alone is not persisted anywhere, while it is just a rich description of what the component should be, to do that we need a renderer that will create a virtual node and mount it to the environment we’re looking for, either the Web or Native.
const container = document.createElement('div')

// This is effectively will render `<Component />` as the first node of our tree
ReactDOM.render(<Component />, container)
The rendering process is out the scope of this article as it very particular to every framework.
One key difference of runtime environments is that they can provide good abstractions and take advantage of syntax hints to know how to call components and keep track of their lifecycle.
Jump to heading Component-driven approach
Understanding the underlying concepts and principles behind the framework and tools we use can be a daunting task, but worthwhile as we can get a broader view of different scenarios and improve our intuition when approaching complex challenges.
Once we understand a little bit about the component implementation, we now can think about their conceptual design from three principles:
Jump to heading Scope
In the last post, we talk about the anatomy of a component and how it can communicate with others. As part of the data flow, props are the primarily interface where other components will talk to each other. Being powerful as function parameters, we can use props to avoid hardcoded text, create variants, handle events or add any sort of JS expression to the template.
Although they’re very convenient, oftentimes you get caught by components like this:
<MediaControls
  showControl
  showProgress
  color="primary"
  duration={duration}
  progress={progress}
  isPlaying={isMediaPlaying}
  artwork={metadata.artwork}
  repeat={repeat}
  title={title}
  onTogglePlay={handleMediaPlay}
  onProgressChange={handleProgressChange}
  onSlidingStart={handleSlidingStart}
  onSlidingComplete={handleSlidingComplete}
  onForward={onForward}
  onRewind={onRewind}
  onRepeat={onRepeat}
/>
A component that tries to handle too many props might have too much responsibility in its own scope. Although it might be flexible remember that flexibility comes at a cost. It can be a bigger problem depending on which and how many places it is being referenced as it gets harder to read and maintain.
Avoid passing props through multiple components as much as possible and try to handle events earlier in your component tree.
Jump to heading Modularity
Start small. By breaking down components in a modular way, we can effectively decouple their logic and isolate them from the rest of the user interface (UI). Drawing inspiration from Brad Frost’s concept of Atomic Design, we can adopt a systematic approach to creating a robust and scalable system:
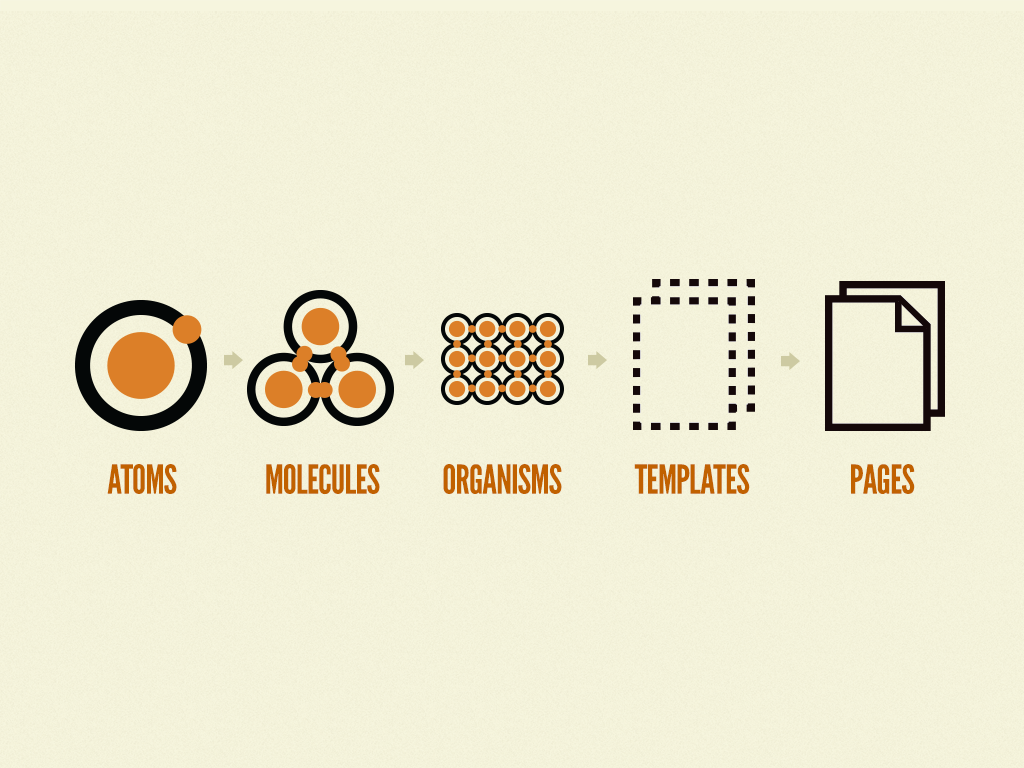
The first layer of our design system comprises atoms, which serve as the fundamental building blocks. Atoms should ideally possess minimal or no logic, ensuring they remain concise and highly reusable. Examples of atoms include buttons, text elements, and input fields. By keeping atoms simple and self-contained, we lay the foundation for creating more complex components.
Moving forward, we progress from atoms to start combining components to gradually unlock new functionalities. As we layer these components upon each other, we incrementally increase the complexity of our system. Despite the growing intricacy, our focus remains on maintaining loose coupling between the components, ensuring flexibility and ease of maintenance.
The higher we get at the top of our view layers the closer we get to assembling pages and including them in our app, at the same time we start thinking of fetching and managing data and orchestrating business logic.
Jump to heading Composability
As your project grows, you will notice that many of your designs can be composed by reusing components you already made, speeding up your development. Component composability plays a crucial role in building scalable and maintainable applications.
In order to approach composability, we can take advantage of any of the patterns we’ve seen in this series: Compound components, Uncontrolled components, Render props, Slots or Dynamic components. Keep in mind that each pattern is intended to address a particular problem.
If you’re building a component library, you need to make sure components can work in isolation and together when combined with other primitives. This is where tools such as: Storybook and bit.dev can be helpful.
Finally, try yourself and see the components that you or your team are building on a daily basis. Do they have a well-defined scope? Are they dealing with too much business logic? Can you take the same component and use it somewhere else without any issues?
More importantly, prioritize code reusability, readability, and ease of maintenance, as components can be independently developed, tested, and updated without impacting the entire application.